Contents
- Description
- Requirements
- Client Setup
- Required Setup Data
- HTTP Message
- HTTP Header Fields
- Custom HTTP Header Fields
- Salesgenie Databases
- Field Layouts
- Summary
- Setup Process
Description
Salesgenie Connect provides a data export option that will send Salesgenie data directly to a specified endpoint for processing via an HTTP Post Request also referred to as a WebHook.
Requirements
Client Setup
To have access to Salesgenie Connect and receive data, a target will be created to send the data to. It is possible to have one or more targets. For each target, this is the data that is needed.
Required Setup Data
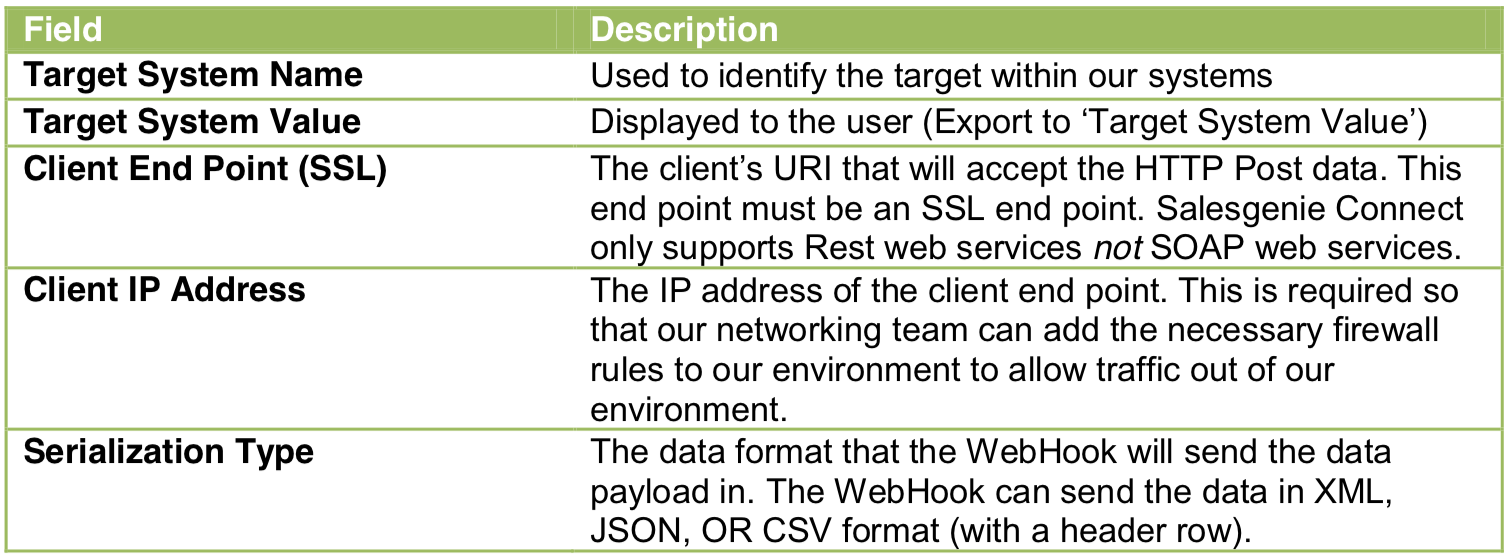
HTTP Message
HTTP Header Fields
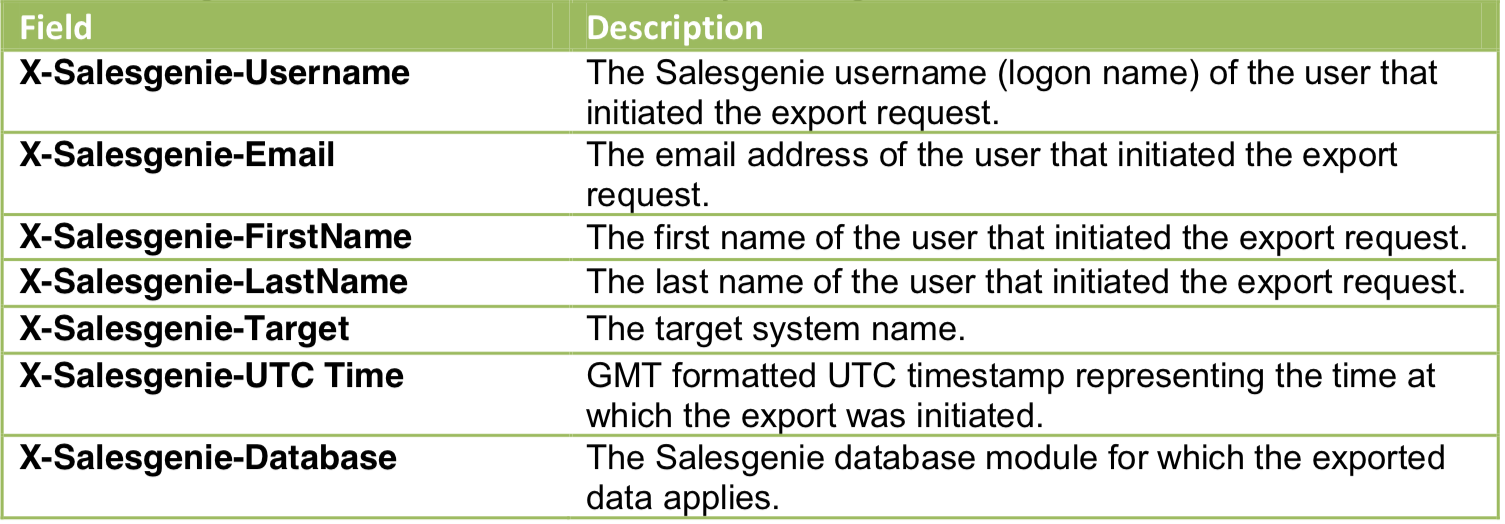
Salesgenie Connect sends the user/target specific data within the HTTP Headers of the HTTP Post message. These fields are sent with every message.
Custom HTTP Header Fields
The WebHook can also include custom fields in the header at the client’s request. There are two types of custom fields available: static and user provided. The HTTP header field name will be send with a name using the format X-Data Axle-fieldname.
Static
A static custom header field and value will always be the same with each request sent to the client and will be the same for all users.
User Provided
A user provided custom header field will prompt the user to provide a value for each export. A user provided field can also be declared private. A private field will prompt the user with an HTML password form field that will not display the data on the screen as it is entered.
Salesgenie Databases
Salesgenie Connect is available for all Salesgenie databases: US Business, US New Business, US Consumer, US New Mover, CA Business, CA New Business, and CA Consumer. A target system may be made available for all or only selected databases. The client will provide to their sales rep which database(s) they would like Salesgenie Connect to be made available on for each target system. Note that if an individual user does not have access to a given database, they will not be able to export to the target system from that database.
Field Layouts
For each database that Salesgenie Connect is made available on, the client will choose which data fields they would like sent to the WebHook. The Data Axle sales rep will provide the client an Excel file with the available fields for each database. As many or as few fields can be chosen as are needed for each database. At least one field must be chosen for a database to have Salesgenie Connect enabled on that database. Data Axle will provide the client a sample payload specific to the fields that they’ve chosen in the client’s preferred data format to provide to the client’s developer.
Summary
To be setup with custom access to Salesgenie with Salesgenie Connect, the following must be provided.
- Required Setup Data – target system name, target system value, client end point (SSL), client IP address, serialization type
- (Optional) Custom HTTP Header fields – if requested, whether this will be static or user provided
- Salesgenie Databases to have target system active on
- Fields requested for each Salesgenie database
Setup Process
Once the client has provided the setup information to their sales rep, firewall rules will be setup on Data Axle’s side to allow our servers to initiate a connection to the client’s server. This may take several days to complete. If firewall rules need to be setup on the client’s side, they should white list these IP addresses: 199.125.8.2 and 199.125.14.26.
The Data Axle sales rep will provide the client a sample payload so that they may update their web service to accept data from Salesgenie Connect in the proper format.
Once the client has updated their web service and Data Axle has setup the proper firewall rules, Data Axle will activate the target system(s) for the appropriate users to have access to export to it.